Pi-Hole - remove ads before they reach your devices

I’ve used some ad blockers like u-block origin but I’ve decided to go beyound with a network-wide ad blocking : Pi-hole.
To remove ads without any browser extension/plugin will need :
- Raspberry 3 B or B+
- Power supply for it
- SD Card
- Ethernet cable
These steps have been done on macOS but are also valid for linux and you won’t need any keyboard or screen for the Raspberry.
1 / Install Raspbian
Download Raspbian Strech or Lite here. Unzip and place it in your desktop. Then rename it raspbian.img.
There are different ways to install Raspbian, the easiest way is to use this software but I’ve decided to install the OS on the terminal :
a) Find your SD card name with the command :
diskutil list
Mine is disk2. If you have something else, remember to replace disk2 with your result in the following commands.
b) Install raspbian by typping in the terminal :
sudo dd bs=1m if=/Users/admin/Desktop/raspbian.img of=/dev/disk2
Nb : replace admin by your user name. If you don’t know your user name just type pwd and it will appear after /Users/.
*This will take time, do not close the terminal. If it doesn’t work, try to replace bs=1m with bs=1M.*s
Once it’s done, you should see a lot of strange files inside you SD card.
2 / Activate ssh
Really easy, just copy any file inside the sd card and remove the extension and rename it ssh (at root level). Or just create a file without extension named ssh, same result.
3 / Connect the Raspberry
Create a file named wpa_supplicant.conf at the root of the SD Card and paste the following code and replace wifiNameHere and wifiPasswordHere with your wifi name and password.
update_config=1
ctrl_interface=/var/run/wpa_supplicant

network={
scan_ssid=1
ssid=”wifiNameHere”
psk=”wifiPasswordHere”
}
Nb : at first I copied a txt file and renamed it wpa_supplicant.conf but it wasn’t working because the file was wpa_supplicant.conf.txt behind the scene. Make sure it’s wpa_supplicant.conf and not something else. To do so you can open the file with a code editor, like vscode.
Now put the SD Card inside your Raspberry and connect it with the ethernet cable to your box.
4 / Set a static ip
Find your Raspberry ip by scanning the network or simply using the app name Fing available for iOS and Android. I found my Raspberry at 192.168.0.7
Now connect to your Raspberry through ssh with :
ssh pi@192.168.0.7
Type yes, enter password raspberry and then type
sudo nano /etc/dhcpcd.conf
Delete the content of the file and paste :
interface eth0

static ip_address=192.168.0.10/24
static routers=192.168.0.1
static domain_name_servers=192.168.0.1

interface wlan0

static ip_address=192.168.0.10/24
static routers=192.168.0.1
static domain_name_servers=192.168.0.1
Nb 1: To save the change : ctrl + o and close : ctrl + x.
Nb 2 : Check if 192.168.0.10 is not already taken, with Fing for example. If it is the case, replace the 10 in 192.168.0.10 by a random number not taken in Fing (this number needs to be above to 1 and lower than 256).
Now restart Raspberry with :
sudo reboot
And connect again with SSH but this time with the static ip :
ssh pi@192.168.0.10
5 / Install Pi-Hole
Start installation of Pi-Hole with :
curl -sSL https://install.pi-hole.net | bash
Say ok to everything by pressing enter all the time until installation is complete. Then type :
sudo pihole -a -p
And enter your password for the admin. Access the admin here : http://192.168.0.10/admin/
Ps : leave ssh tunnel with exit command.
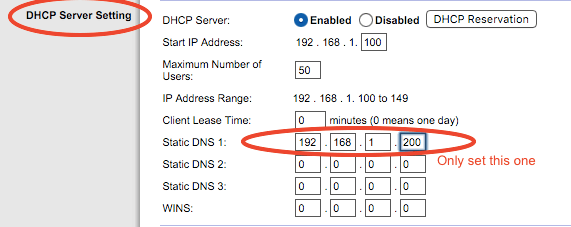
6 / Change DNS
Configure your router’s DHCP options to force clients to use Pi-hole as their DNS server, or manually configure each device to use the Pi-hole as their DNS server. Type ‘change ios dns’ in google if you don’t know how do it.
Enjoy!
Published Jan 12, 2019
hack
wifi
ads
raspberry
Writing good articles takes a lot of time and energy ⚡️
Feel free to support me